Prior to the turn of the century, the overhead squat was primarily used by competitive weightlifters. Olympic weightlifting coaches use the overhead squat as a teaching progression for novice athletes. The overhead squat is used to strengthen the bottom position of a barbell snatch.
Since the recent boom in CrossFit, the use of the overhead squat has become more wide spread. It has been transformed into a staple exercise for training for many sports and has even been used in competition.
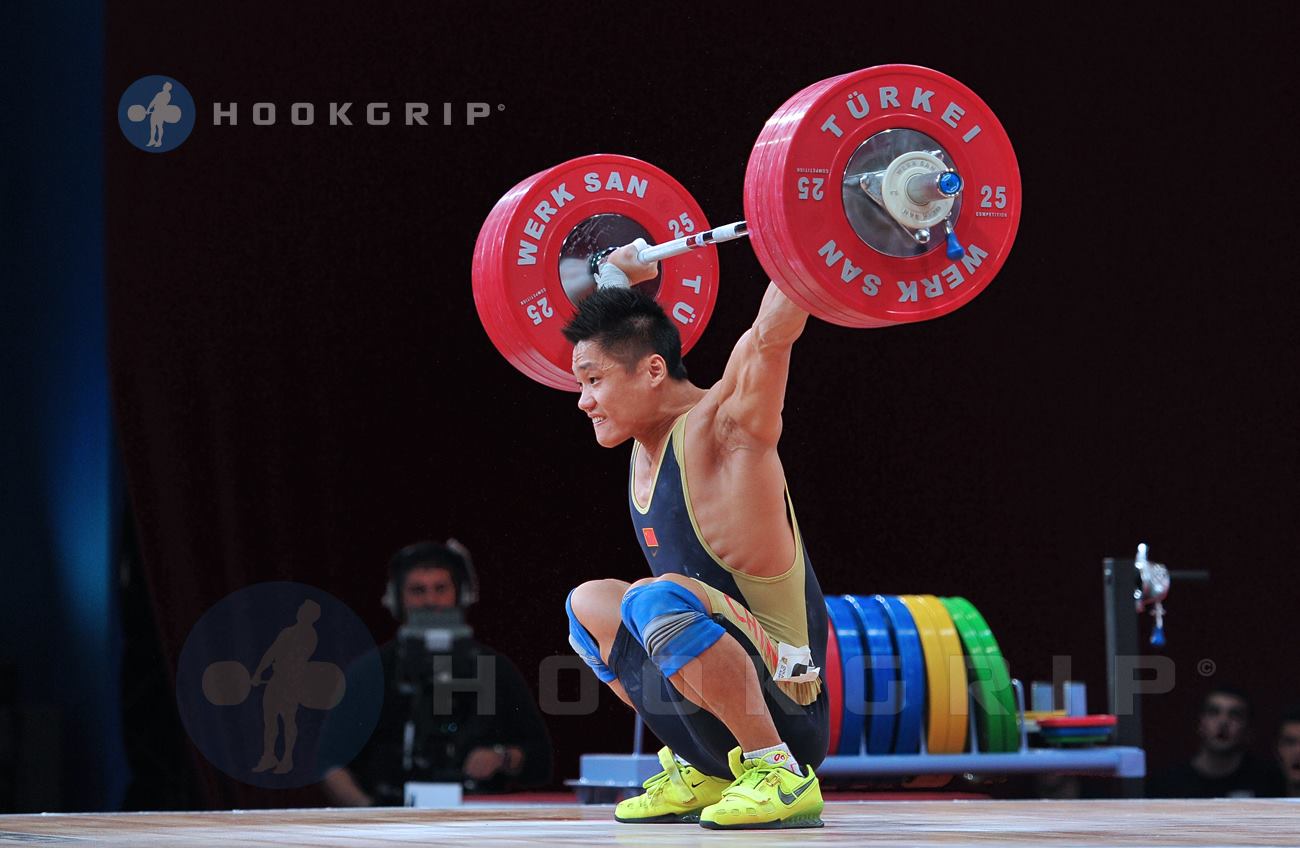
In order to perform this lift correctly, an athlete must have a high level of coordination, balance and mobility.
Bar or PVC Pipe?
For inexperienced athletes or young children first learning to overhead squat, a barbell may be too heavy. For this reason, a lightweight PVC pipe or a broomstick can be used in place.
To find a proper grip with a PVC pipe that has no markings, try this simple method. Stand tall and pull your elbows out to the side. Your arms should end up in a 90-degree “L” position. Measure the distance between your right and left hand. Now mark that distance on the PVC pipe. Place your index finger on this line when grasping the pipe during the overhead squat.

When transitioning to the bar, athletes will usually take their grip a few inches from the end of the bar. This will be the same grip taken for the barbell snatch lift. Athletes with longer arms may need to take a grip almost to the end of the barbell, near the collars. Those with shorter arms may only need to place their grip around the outer notch of the bar.
The Set Up
To start, hold the barbell on your upper back. This will be the same starting position as the high-bar back squat. After un-racking the barbell properly, the weight will need to be hoisted to the overhead position. This can be done in a number of ways depending on the amount of weight on the barbell and the individual preference of the lifter.

When first learning how to perform the overhead squat most coaches will teach a simple push-press to hoist the barbell to the overhead position. Once the weight increases to a significant load, a push-jerk or split-jerk is recommended for experienced weightlifters.
To start the push-press, pull the your elbows underneath the bar. This will place your arms in an efficient position to drive the barbell upwards. The hands should be at a snatch-grip width.

Next, take and hold a large breath. Brace your core muscles as if about to receive a punch to the stomach. Stabilizing the core through proper breathing and bracing allows your body to generate tremendous power for the rest of the lift. The dip & drive movement is then used to push the barbell overhead.
Drop your hips straight down a few inches while keeping your torso in a vertical position. A cue that is often used to maintain this straight dip is to imagine the feeling of your back sliding down a wall. If the hips drive backwards during the dip it will cause the chest to push forward. This will set you up to push the barbell forward into a bad overhead position.

During the controlled dip, the knees should be kept in proper alignment with the feet. This will allow for an efficient transfer of power from the legs to the arms during the push. If the knees collapse inwards on the dip, you will limit the potential upward driving power you can create with your legs.
After the dip is performed, push the barbell straight up by extending the hips, knees, and ankles in a powerful motion. The barbell should end up in a stable overhead position just over the back of your neck.
Here’s a great demonstration of the dip and drive movement to position the bar into an overhead position from Catalyst Athletics.
Your head can be pushed forward slightly to allow for this stable position. Be careful not to push the head too far forward! This will cause the chest to lean forward excessively and throw you off balance.
To keep the barbell overhead in a firm position the elbows should be completely locked out. You will have a difficult time keeping the barbell from wavering around if the elbows are not completely straight.
In this overhead position, the barbell should rest in the center of the palm. The wrists should be slightly extended. This is a position of stability that will not cause too much stress to the wrist joint. Do NOT try and keep a neutral straight wrist during an overhead squat!

Make sure to gaze straight forward or slightly upward. This will place the neck in a neutral position and limit any unwanted stresses. Looking upwards excessively or down towards your feet can throw you off balance.
The Descent
Once you have stabilized the bar overhead, it’s time to start the descent. Push your hips back slightly to engage the posterior chain. As you begin your squat, think about sitting your hips onto your heels. This cue helps limit a large hip hinge that can throw you off balance. Control the descent to full depth.

The bar should always remain aligned over the middle of your foot for balance and stability. Proper technique is critical as a missed lift can lead to injury. If at any time the lift becomes unstable, push the bar forward or backwards and dump the bar to the ground. Both are completely safe alternatives for missing a weight. I recommend using bumper plates whenever doing overhead squats. Be aware of your surroundings.
Here’s another example of an overhead squat from Catalyst Athletics.
The Bottom Position
The knees should be allowed to translate forward over the toes at the deepest part of this squat. This will allow you to maintain the desired vertical trunk position to keep the bar overhead.

The Ascent
The hips and chest should rise at the same rate during the ascent of the squat. If the hips rise fast and the chest stays forward, the barbell will drift towards your toes likely causing you to drop the weight.
Once you’ve come to a stable standing position, slowly control the bar down to the “shelf” position on your upper back. Letting the bar drop too quickly can lead to serious injury to the neck. If the weight is heavy, a slight dip can lessen the intensity of receiving the bar.
Overhead Squat Sequence
- Establish a safe starting position. The barbell should be resting on the upper traps (as with the high-bar back squat) with the elbows pulled under the barbell.
- Create a rigid trunk by taking a big breath and holding it tight. (Verbal cue: big breath & core tight).
- Use a controlled dip & drive to push the bar into an overhead position (Verbal cue: slide your back down a wall and drive upwards with power)
- Stabilize the barbell (Verbal cue: drive your hands to the ceiling & lock your elbows out).
- Use a slight hip hinge to engage the posterior chain.
- Remain balanced by keeping the bar positioned over the mid-foot the entire squat.
- Hips & chest rise at the same rate on the ascent.
Until next time,

With

[…] I had to single out one exercise that most athletes struggle with, it would be the overhead squat. There are so many variables that could hurt your overhead squat […]
I can’t help but come up on my toes beginning halfway down in the overhead squat. What do I need to do to fix this?
I try to keep my elbows under the bar, but as I increase weight they tend to go back. Do you have any tips to fix that?
Jesse, search for tips on improving ankle mobility and thoracic spine mobility on https://squatuniversity.com and https://www.instagram.com/squat_university/
Also this article may be of help http://www.thebarbellphysio.com/top-five-thoracic-mobility-drills-to-improve-your-overhead-pressing/
[…] When squatting barefoot, most people will actually lean further forward with their chest in order to stay balanced (7). From a technique perspective, barefoot training may not be ideal for athletes who need to maintain a more upright trunk during their squat. This would include anyone performing the high-bar back squat, front squat or overhead squat. […]
[…] the sport of weightlifting athletes will commonly use the high-bar back squat, front squat and overhead squat techniques. These barbell movements resemble the positions an athlete will use during the competition lifts of […]
[…] Overhead Squat […]
This article has really helped my OHS! Thank you!
Overhead is definitely my weakest squat, but still my favorite! Not many things are more satisfying than holding a big weight over your head and squatting it.
What are your thought on shoulder internal rotation and external rotation with the bar overhead? Lost of variety in weightlifters.
Great community, I would like to join. Recently, I have been keen on sports, although I could not afford it before, but thanks esport betting real money to I can do whatever I want.
How do you put the bar down when you’re done? No tutorial has mentioned this, am I missing something?
[…] […]
[…] Overhead Squat: Good squat variation for core strengthening, improving torso posture/hip mobility, and strengthening the shoulders/back for Olympic lift variations. Check out this link article for great advice on technique. […]
[…] Overhead Squats (185/135 […]
[…] Also, since this exercise improves flexibility and stability, most Olympic weightlifters perform overhead squats. […]
[…] Additionally, since this train improves flexibility and stability, most Olympic weightlifters carry out overhead squats. […]
[…] train that targets all of the muscle mass in your physique. Now you’ll be able to have perfect squats with resistance […]
[…] and straightforward train that targets all of the muscle mass in your physique. Now you may have good squats with resistance […]
[…] train that targets all of the muscle tissue in your physique. Now you possibly can have excellent squats with resistance […]
[…] this is a famous and easy exercise that targets all the muscles in your body. Now you can have perfect squats with resistance […]
[…] que destacar un ejercicio con el que la mayoría de los atletas tienen dificultades, sería el sentadilla por encima de la cabeza. Hay tantas variables que podrían perjudicar tu técnica de sentadilla por encima de la […]