For the last few weeks, we have been discussing the topic of low back pain. In our most recent article, I unveiled a simple step-by-step protocol screening your back along with a few ways to start winding down your symptoms. Today I want to share how to start fixing your injury so you can return safely to barbell training.
In my career as a physical therapist, there are few who have had a greater impact on how I approach treating low back injuries as Dr. Stuart McGill of Waterloo University. Over the past few decades he has written extensively on the topic of back injuries and the concept of core stability (in books such as Ultimate Back Fitness and Performance and Back Mechanicas well as in countless professional journals articles – visit www.backfitpro.com).1While I want to briefly go over the basics of each with you today, I highly suggest diving deeper into these topics with his publications.
Complete Rest Is Never A Fix
Think about the last time you went to your family doctor with a complaint of pain. If you experienced that pain while lifting a barbell, there’s a good chance the doc uttered these words, “I recommend not lifting for a few weeks.” Sound familiar?
It’s true many find some short-term relief of their symptoms by following these orders. It makes sense on paper. If deadlifting causes your back to hurt, not deadlifting will likely decrease your pain! Problem solved right?
Wrong.
While eliminating what triggers your pain for a few weeks will likely decrease your symptoms, it is never a final solution. Chances are the pain will eventually return because you never addressed why the problem started in the first place.
Eliminating the movement, posture or load that causes your pain is only half of the battle in fixing any injury. Anyone can tell you to stop doing something that hurts. Eliminating symptoms and building your body to become more resilient to future injury requires a different and more active approach.
To kick-start this active approach, let’s start by learning about our body’s ‘core’ and how it’s function relates to both the cause and fix of injury.
What is ‘core stability?’
Imagine for a moment a symphony orchestra composed of countless musicians. Just as each and every person must play their instruments in a united manner with constant changes in tempo and volume, our body must too coordinate each and every muscle and joint to create purposeful and sound movement.
The muscles that surround our spine are considered the “core” of our body. It is composed of the abdominal muscles on your front and sides, the erector muscles of the back and even the larger muscles that span multiple joints (like the lats and psoas muscles). It may surprise you that the glutes are also an important part of the ‘core’ (something you’ll learn about very soon!). Each and every one of these muscles must work together in order to enhance the stability of the spine. But what really is ‘stability’?
Spinal stability is something Professor McGill has been able to define and measure with his work. First, when muscles contract they create force and stiffness. It is the stiffness part that is important for stability. Think of the spine as a flexible rod that needs to be stiffened to bear load. This is the role of the muscles. Through his research, he has measured athletes who fail to obtain appropriate muscular stiffness around the spine by coordinating muscle activation, and their subsequent injuries and pain.
Second, our body functions as a linked system. And distal movement requires proximal stiffness. Consider trying to move a finger back and forth very quickly – the wrist needed to be stiffened otherwise the entire hand would move. Now using the same principle consider the action of walking. The pelvis must be stiffened to the spine otherwise the left hip would fall as the left leg swings forward to take a step. This core stiffness is non-negotiable to enable walking. Thus all body movement needs appropriate coordination of muscles. To move, run, or squat requires spine stiffness and core stability.
When the core fails to meet the stability demands placed on the body during a certain lift, parts of the spine will be overloaded with forces that increase injury risk and performance will suffer. Much like a trumpeter squealing off pitch and out of tune would instantly dismantle the entire orchestra’s sound, each and every muscle that surrounds the spine must play it’s part in maintaining our body’s own “symphony of movement” in order to produce safe and powerful movement.
Where Do We Start?
There are two general approaches many will take to address a weak link of the core. The first (and most common method you’ll see in fitness clubs across the world) is through dynamic strengthening exercises such as crunches, back extensions or Russian twists. Traditionally coaches and medical practitioners have used these exercises that build strength through movement with the mindset that a stronger core will give the spine less chance for buckling and breaking under tension.

To a point this is true. Each muscle that surrounds the spine does need to have sufficient amount of strength to contract and ‘turn on’. When the muscles of our core contract, stiffness is created. Much like a guy-wire that attaches and holds up a radio tower, each muscle that surrounds the spine must provide a certain amount of tension and stiffness to maintain the strength of the spine as a whole and keep it from buckling and becoming injured.

However, here’s what most people don’t understand. Many people who develop back pain already have strong backs!4 While exercises like Russian twists, sit-ups or back extensions from a GHD machine may be great at increasing strength, they do little to increase core stiffness.8
In order to enhance the quality of stiffness, one must train the core differently. This comes through the second approach of using isometric exercises built to enhance muscular endurance and coordination.
An ‘isometric’ describes when a muscle or group of muscles are activated and contracted but there is no change in the joints they cross. For example, during a side plank the lateral oblique and quadratus lumborum (QL) muscles are very active yet the spine and hips remain still and do not move. Research has found that isometric exercises to enhance muscular endurance are far superior when compared to dynamic strengthening exercises in enhancing spinal stiffness and stability (making them ideal not only for rehabilitation of back injuries but also in the training and enhancement of athletic performance).8
This is because the core functions to limit excessive motion (especially in barbell lifting) rather than creating it. Therefore, the traditional way in which the fitness and rehab world has approached addressing the core for years has been completely backwards! This is why someone can have a ripped six-pack and yet have poor core stability when it comes to deadlifting or performing a squat.
In order to stiffen the torso and limit excessive motion, every muscle of the core must co-contract or work together. When this is done correctly through a bracing action, your body creates it’s natural “weightlifting belt.” Not only will this stiffen your spine and keep it safe when performing heavy lifts (like a squat or deadlift) it will also help transfer force throughout your body. For example, a weightlifter performing a jerk requires sufficient core stability in order to transfer the power he or she generates from their legs through the core and into the upward drive of the barbell.
All For One, And One For All
Much like the symphony orchestra illustration from before, each and every muscle of the core has a role to play, but none is more important than the other. For this reason, proper stability training should not focus on one specific muscle. For decades, medical practitioners were incorrectly taught to focus and isolate certain muscles such as the transverse abdominus (TA), multifidus, or QL in an effort to enhance core stability. This method however, is flawed for a number of reasons.
First, research has shown it is impossible for an individual to solely activate one specific muscle of the core. Despite what your physical therapist or doctor says, you cannot train your multifidus, QL or even your TA muscle in isolation.
Even it were possible to target a specific muscle of the core (as some would argue is possible through exercises like abdominal hollowing), methods like this have been shown to be far less efficient in creating stability for the spine compared to abdominal bracing (contracting all of the core muscles together).15
The Big 3
Now that we know what type of exercises are superior for rehabbing back injuries, it’s now time to discuss which exact exercises to start with! There is unfortunately no “one size fit’s all” when it comes to core exercises because there is no one universal movement that equally stresses all of the muscles that surround your spine. For this reason, we must utilize a regime of exercises to efficiently work all of them.
In his years of studying the spine, Dr. McGill has found there to be three specific exercises that most efficiently address all of these areas without placing excessive stresses on the parts of the back that may be aggravated or irritated due to injury. This group of exercises has famously become known as ‘The Big 3.’
- Curl-Up
- Side Plank
- Bird-Dog
Mobility First
Before I describe each of these recommended core stability exercises, it is suggested to first decrease any significant mobility restrictions at the hip and thoracic spine.
If mobility in either of these areas is limited it can lead to movement compensations at the low back. For example, if there is limited hip mobility during the squat motion the pelvis can be pulled underneath (posterior pelvis tilt) causing the lower back to leave its neutral position and round.
For this reason, if you only performed core stability work but did not address any significant mobility restrictions in joints above or below the lumbar spine, the stiffness you created will always be short-lived.
Another mobility movement Dr. McGill recommends you perform before the Big 3 to reduces low back stiffness and improve motion of the spine is a ‘Cat-Camel.’ Unlike other stretches for the low back that can place harmful stresses on the spine, this exercise emphases mobility in a very spine-friendly manner.
Step 1: Assume an all-4’s (quadruped) position on your hands and knees.
Step 2: Slowly arch your entire spine and hips as high as possible without pain into a flexed or rounded position. You should end with your head looking down towards the ground. This is the camel position. After pausing for a few seconds move into the opposite downward extended position with the head looking up (the cat). Make sure you only move into a light stretch for each position and do not force your spine into any pain.
Perform 5-6 cycles of this exercise before moving on to starting the Big 3 with the curl-up.11
The Curl Up
When most people perform what they have been taught to be a ‘curl up’ they bend or flex their entire spine and attempt to bring their chest towards their knees. While this exercise does activate the anterior core muscles to a great degree (especially the rectus abdominis or 6-pack muscle) the ‘crunch’ motion does a few things that isn’t so appealing especially for those currently dealing with back pain.
First, the motion of the classic curl up places a large amount of compression on the spine that can flair up symptoms for those who are ‘load intolerant.’ (refer back to the previous blog on screening your low back to see if this describes your back injury).17
Second, the motion also pulls the spine out of its neutral slightly arched position and flattens it into a bit of flexion. If your low back symptoms increase with bending of the spine (a term called ‘flexion intolerance’) this motion should be avoided at all costs.
The traditional curl up also relies heavily on the psoas muscle of the anterior hip to pull the torso towards the thighs. So while you think you may be isolating and sculpting that sexy 6-pack by doing endless crunches, you’re actually doing a really good job of strengthening your hip flexors.16
A way we can still hone in and focus our attention to improving the stabilizing ability of the anterior core muscles in a more efficient way is to perform a modified curl up.
Step 1: Lie on your back with one knee bent and the other straight. If you currently have pain that radiates down one leg, flatten that leg out against the ground. Place your hands under your low back (this will ensure your spine remains in a neutral slightly arched position during the next step).
Step 2: Pick your head off the ground only a few inches and hold that position for 10 seconds. If you’re resting your head on a pillow, imagine it as a scale and lift your head off of it only enough to make it read “zero” on the dial or screen.2 The goal is to perform this curl-up without any movement in the low back! If you raise your head and shoulders too high (like a traditional curl-up or crunch) your low back will round and excessive forces will be transferred to the spine that could increase your symptoms.

Step 3:After a 10 second hold, relax your head back down to the resting position.
You can progress this exercise and increase the difficulty by bracing your abs before moving you head or raise your elbows from the ground to decrease your base of stability.3

How Many Reps To Perform
Unlike training for pure strength or power, the endurance component of stability requires the body to perform many repetitions of an exercise in order to see improvements. Dr. McGill advocates for using a descending pyramid rep scheme with 10-second isometric holds in order to enhance stability without fatiguing and over-working the body.
An example program would be to perform five reps, then three, and finally one to end (each with an 8-10 second hold). Rest between each set for 20-30 seconds. As this rep scheme becomes easier, it is recommended to increase the amount of repetitions rather than the duration of the holds in order to build endurance without causing muscle cramping.3This can be freely modified to suit your current individual level of endurance and goals (for instance using a 6-4-2 or 8-6-4 rep scheme).
I have personally found this method of training the core to be very effective in the rehabilitation process of my own patients at Boost Physical Therapy & Sport Performance.
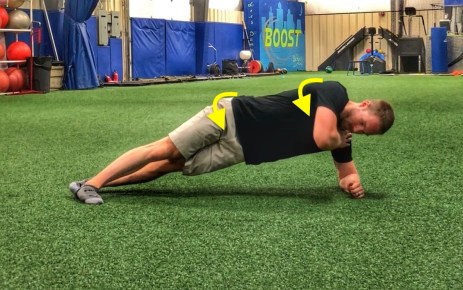
The Side Plank
After addressing the anterior core muscles, let’s now move to the sides of the body. The side plank is a unique exercise as it activates the lateral oblique and QL muscles on only one side of the body, making it an excellent choice for addressing weak links in stability while placing minimal forces on the spine. It also engages an important stabilizer of the hip/pelvis on the lateral hip (the glute medius).12
Step 1:Lie on your side with your legs bent and upper body supported through your elbow. Place your free hand on your opposite shoulder.
Step 2: Raise your hips so that only your knee and arm support your bodyweight.

Step 3: Hold this position for 10 seconds before returning back down. Perform the same descending pyramid rep-scheme for each side.
There are a number of fun progressions you can do with this exercise. You can start by moving your hand placement from your opposite shoulder to the top of your hips or even move to a full side plank (bodyweight supported by your feet and elbow).
Perform the full side plank with one foot directly in front of the other, because you can also take it one step further and incorporate a rolling pattern (where you would tilt or rotate your body towards the ground and back towards the ceiling) if the side plank alone is easy. Make sure to keep your shoulders, torso and upper leg in a direct line during this roll to keep the low back safe.
If you are unable to accomplish even the modified side plank (bridging from the knees) due to shoulder or arm pain, you can perform a side lying leg lift. Start by lying on your side, brace your core muscles appropriately and raise both legs off the floor together a few inches. Hold them for 8-10 seconds before relaxing down.

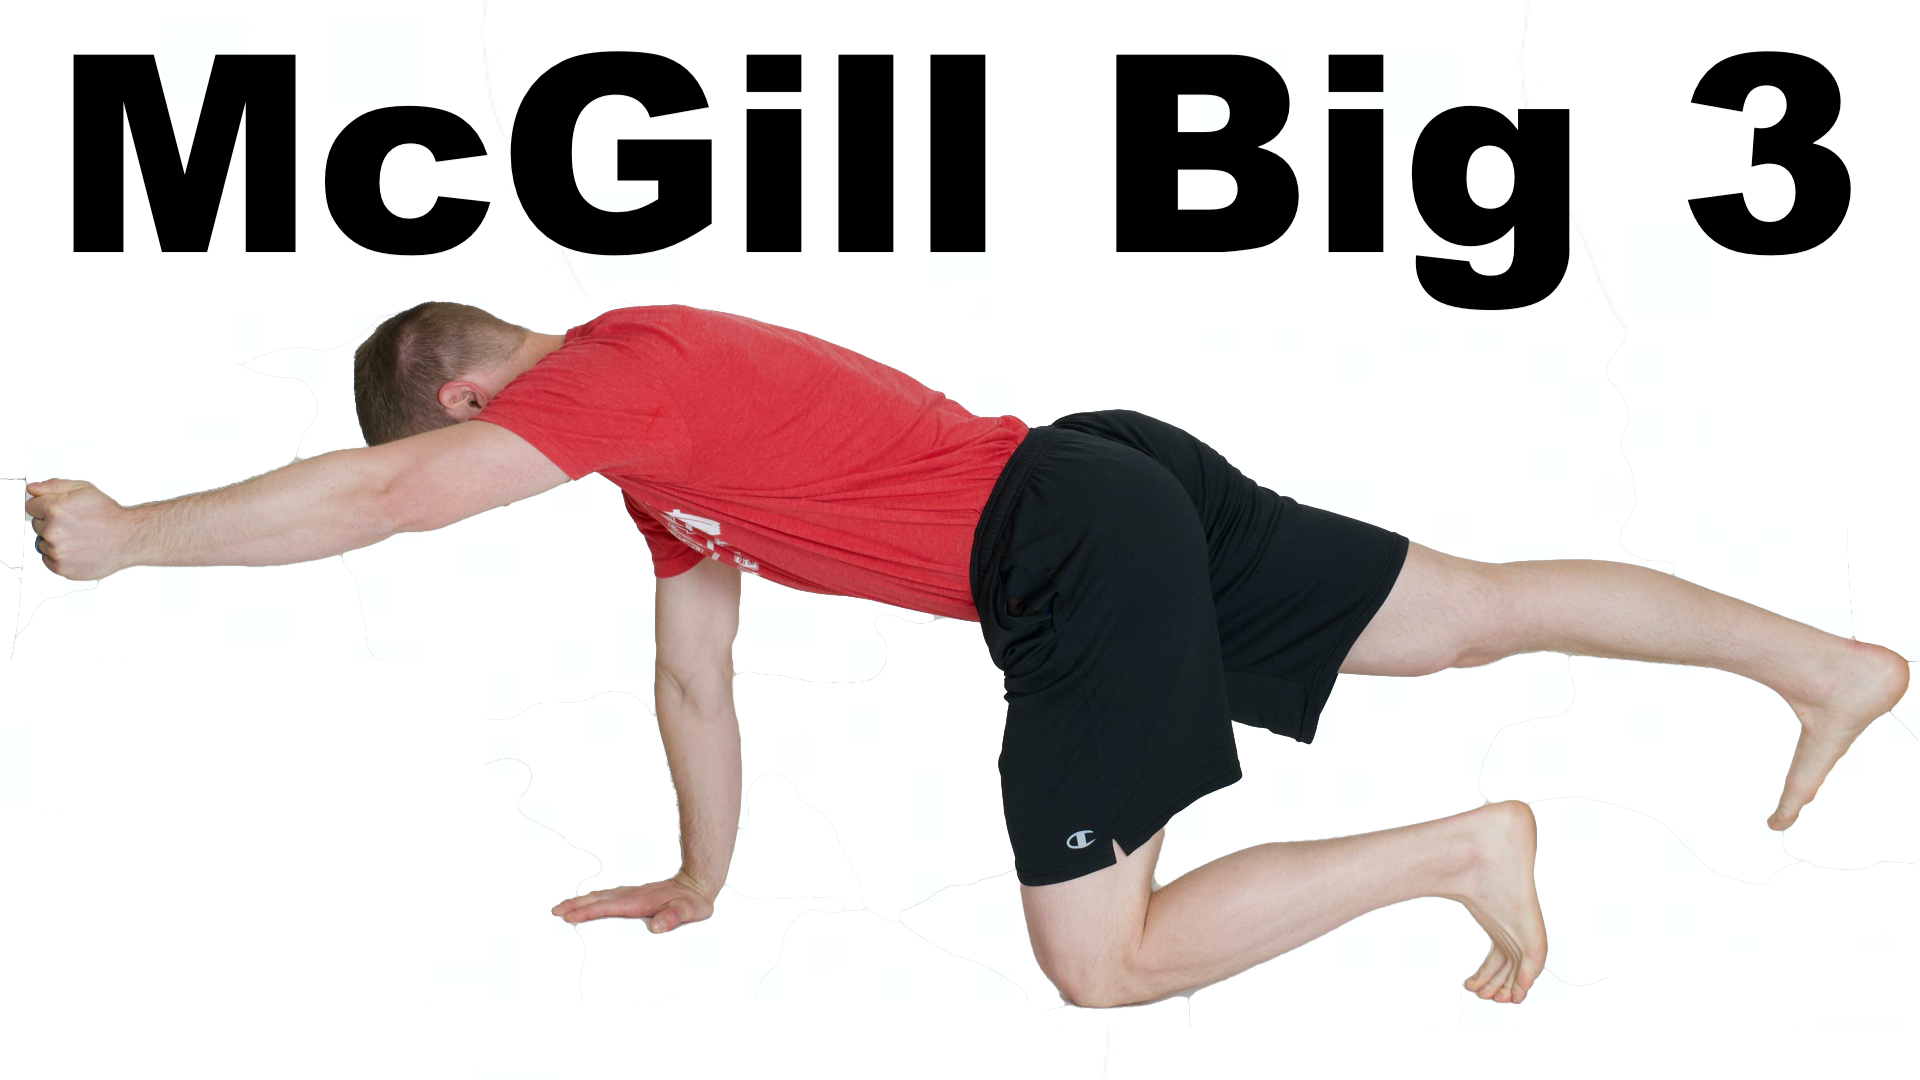
The Bird Dog
The last of the McGill ‘Big Three’ is the bird dog. This is an excellent exercise to promote a stable core while movement occurs at surrounding joints (either the legs or arms and legs together). The combination of movement occurring at the hips and shoulders while the low back remains stable allows this exercise to have excellent carry over to movements you perform throughout your day and in the weight room.
Step 1:Assume an ‘All 4’s’ position (quadruped) with your back in a neutral alignment. Remember a ‘neutral’ position is a very slight arch and not completely flat.
Step 2:Without allowing any movement to occur at the low back, kick one of your legs backwards while simultaneously raising the opposite side arm until both extremities are fully straightened. A helpful cue to make sure the leg movement doesn’t create an over-arching of your back is to think about kicking the heel of your foot straight back. Making a fist and contracting your arm muscles as you hold it in the extended position can also increase muscle activity of the core (especially of the erector spinae muscles).
If you are unable to perform the arm and leg movement together without pain or it is too difficult without losing balance, try the modified version with only leg movement.

Step 3:Hold each extended pose for 10 seconds before retuning back to the starting All 4’s position. You can also ‘sweep’ your arm and leg back underneath your body in between each repetition. Don’t let your back round during this motion but instead maintain the neutral spine position and allow the motion to only occur from the hips and shoulders! Again, perform the same descending rep-scheme as the previous two exercises.
You can progress this exercise by drawing a square with your outstretched hand alone or your hand and opposite foot together.
What About Low Back Stretching?
If you didn’t notice, the prior exercises to kick-start the rehabilitation process did not include any stretches for the back! Early in my career as a physical therapist, it was common to prescribe certain stretches (like pulling your knees to your chest while lying on your back) as an exercise for many with low back pain.
At the time this exercise made sense. Those who had difficulty standing for long periods or lying flat on their back often felt better when in a flexed position. Many who complained of feeling stiff and painful in their low back had instant relief of their symptoms after performing a few of these stretches.
However, I realized (after reading and studying from Dr. Stuart McGill) that this relief is only a temporary relief for most. When you stretch your low back, you are stimulating the stretch receptors deep inside the muscles that give the perception of pain relief and the feeling of less stiffness.
As I have written about in earlier blogs, most of the muscle pain and stiffness you may feel in your back is consequence of a chemical reaction called inflammation that occurs from the real injury located deeper in the spine (disc bulge, facet irritation, etc).5,6 The underlying injury is what causes the secondary contraction or spasm of the surrounding muscles and pain.
For this reason, rehabbing from a back injury for a large majority of athletes should aim to stabilize the core and reeducate proper movement to treat why the problem started rather than stretch the surrounding muscles to increase mobility of the low back and treat the symptoms.
Re-Awaken those Sleeping Glutes!
It is common to see athletes with back pain also have an inability to properly activate and coordinate their glute muscles. Simply put, the butt muscles can fall asleep.13When this happens the body naturally starts to use the hamstrings and low back muscles more to create hip extension (both are problematic in creating efficient movement and place excessive stress on the spine).1
If the single leg bridge test (from the prior blog on ‘Screening Low Back Pain’ exposed a problem in how your body coordinates and turns-on the glutes, the following exercises should help.
The Bridge
Step 1: Lie on your back with your knees bent as shown.
Step 2: Squeeze your butt muscles FIRST and THEN lift your hips from the ground. Picking your toes up and driving your heels into the ground can help increase your glute activation during this part of the movement. Squeeze your glutes as hard as you can in this bridge position for 5 full seconds before relaxing back to the ground. If you find your hamstrings cramp during this motion, bring your heels closer to your hips. This shortens the length of the hamstrings and gives puts them at a disadvantage to contribute to the movement (a concept called active insufficiency).14

Recommended sets/reps: 2 sets of 20 for a 5 second hold. Eventually work your way up to 10-second hold.
Deep Squat With Isometric Hold
Step 1: Hold a weight in front of your body and perform a deep goblet squat.
Step 2: Brace your core in this bottom position and drive your knees to the side while keeping your foot in an arched position (this should turn on the outside of your hips or glute medius muscle.)
Step 3: Rise a few inches and squeeze your glutes like crazy. Hold this for 5 seconds before sinking back down. This translates the glute activation from the previous exercise into something functional that mimics your squat technique. This should only be attempted if you can perform it without any back pain.
Recommended sets/reps: 1-2 sets of 5 for 5 second holds
Final Thoughts
I hope that this brief article was able to give you a better understanding of proper core stability training and how to perform the ‘Big 3.’ I recommend using these exercises not only as a foundation for your rehabilitation from back pain but also as a part of your weekly training program to prevent future injury once your symptoms have resolved.7
The combination of these exercises should be safely performed daily if you are trying to recover from back injury but should not be performed directly after rising from bed in the morning (that is the time at which the discs of your spine are most hydrated and prone to injury).11
The last thing Dr. McGill recommends to couple with the “Big 3” exercises is a regimented walking program.2 Getting up and walking throughout you day can be extremely helpful in maintaining the health of your spine. Start with smaller bouts of walking (5-10 minutes at first with a fast pace that causes you to swing your arms). The goal should be to eventually reach a 10-minute walk three times a day.2
If you continue to have back pain I suggest following the detailed program in Dr. McGill’s book ‘Back Mechanic.’ Then, when out of pain, shift to ‘Ultimate Back Fitness and Performance.’
Next week I will share a number of my favorite core progressions and corrective exercises you can use to continue enhancing your core stability and regain your previous performance.
Until then,

With

References
- McGill SM. Ultimate Back Fitness and Performance (4thed). Waterloo, Canada: Backfitpro Inc, 2009. (www.backfitpro.com)
- McGill, SM. Back Mechanic: The step by step McGill Method to fix back pain. Backfitpro Inc. 2015 (www.backfitpro.com)
- McGill SM. Core training: evidence translating to better performance and injury prevention. Strength and Conditioning Journal. 2010; 32(3): 33-46
- McGill SM. Grenier S, Bluhm M, Preuss R, et al. Previous history of LBP with work loss is related to lingering effects in biomechanical physiological, personal, and psychosocial characteristics. Ergonomics. 2003;46:731-746
- Indahl A, Kaigle A, Reikeras O, Holm S. Electromyographic response of the porcine multifidus musculature after nerve stimulation. Spine. 1995;20(24):2652-8
- Cohen SP & Raja SN. Pathogenesis, diagnosis, and treatment of lumbar zygapophysial (facet) joint pain. Anesthesiology. 2007;106:591-614
- Durall CJ, Udermann BE, Johansen DR, et al. The effect of preseason trunk muscle training of low back pain occurrence in women collegiate gymnastics. J Strength Cond Res. 2009;23:86-92
- Lee BC, McGill SM. Effect of long-term isometric training on core/torso stiffness. JSCR. 215;29(6):1515-1526
- Cholewicki J, McGill SM, and Norman RW. Lumbar spine loads during lifting of extremely heavy weights. Med Sci Sports Exerc. 1991;23:1179-1186
- McGill SM, Cholewicki J. Biomechanical basis for stability: an explanation to enhance clinical utility. JOSPT. 2001;31(2):96-100
- McGill SM. Stability: from biomechanical concept to chiropractic practice. J Can Chiropr Assoc. 1999;43(2)
- Boren K, Conrey C, Le Coguic, et al. Electromyographic analysis of gluteus medius and gluteus maximus during rehabilitation exericses. Int J Sports Phys Ther. 2011;6(3):206-223
- McGill SM. Low Back Disorders: Eevidence Based Prevention and Rehabilitation(2nd ed). Champaign, IL: Human Kinetics Publishers, 2007.
- Olfat M, Perry J, Hislop H. Relationship between wire EMG activity, muscle length, and torque of the hamstrings. Clin Biomec. 2002;17(8):569-579
- Grenier SG, McGill SM. Quantification of lumbar stability by using 2 different abdominal activation strategies. Arch Phys Rehabil. 2007;88(1):54-62
- Juker D, McGill SM, Kropf P, Steffen T. Quantitative intramuscular myoelectric activity of lumbar portions of psoas and the abdominal wall during a wide variety of tasks. Mec Sci Sports Exerc. 1998;30:301-310
- McGill SM. The mechanics of torso flexion: sit-ups and standing dynamic flexion maneuvers. Clinical Biomechanics. 1995;10:184-192
[…] The McGill Big 3 For Core Stability | Squat University […]
[…] The McGill Big 3 For Core Stability | Squat University […]
[…] The McGill Big 3 For Core Stability | Squat University […]
[…] The McGill Big 3 For Core Stability | Squat University […]
[…] The McGill Big 3 For Core Stability | Squat University […]
[…] The McGill Big 3 For Core Stability | Squat University […]
[…] The McGill Big 3 For Core Stability | Squat University […]
[…] The McGill Big 3 For Core Stability | Squat University […]
[…] Picture by Squat University […]
[…] many people, he recommends three exercises to help build help spinal […]
[…] many individuals, he recommends three exercises to assist construct assist spinal […]
[…] many individuals, he recommends three workout routines to assist construct assist spinal […]
[…] many people, he recommends three exercises to help build help spinal […]
[…] I highly recommend reading the full post here. […]
The content you share is wonderful and really rewarding
I really like this article!
Thanks for post!
Hello, the other day my school teacher gave me a task: to write an essay on the topic “Cyber security and everything related to this area.” From my earliest years I didn’t write such works very well, but now I don’t pay attention to them at all. But I don’t want to get a bad grade, so I use example of title proposal for thesis in order to write a competent and beautiful essay that will be appreciated by the teacher.
[…] The McGill Big 3 for Core Stability […]
If you are involved in tracking cryptocurrencies, this platform will become your indispensable and loyal friend. The best cryptocurrency app offers a wide range of tools that allows you to track each of your assets. As for security, the service has a reliable security system. There were almost no cases of account hacking for a large number of years.
[…] The McGill Big 3 For Core Stability […]
[…] what you can (and should) do each day to increase your core stability, then click below to read Dr. Stuart McGill’s Big 3. Dr. McGill has been cited as a leading expert on back pain for decades and through our own […]
[…] experts of spinal mechanics, with over 30 years of experience, Stuart McGill, advises these simple short and effective exercises to prevent and rehabilitate back injuries. We use them now before every workout right before going […]
[…] these types of movements is going to help increase our core stability. We like to recommend the The McGill Big 3 For Core Stability – Squat University, as a starting point for addressing the core as a weak link. Core stability is ultimately what we […]
[…] planking is another isometric exercise that strengthens deeper low back stabilizers and an important strength exercise to overcome low back pain. Start on your knees and work up to your […]
[…] forward , Mgill big 3 along with your hip work. Warmup, Side plank , curl up , and bird […]
[…] no Canadá, Dr. Stuart McGill, é conhecido por ter sido o criador da trinca de exercícios – The McGill Big 3 For Core Stability – que visam “estabilizar a coluna”, e assim, proteger contra a dor […]
A disciplined walking routine is the last thing Dr. McGill suggests to go along with the “Big 3” workouts. Getting up and walking during the day may be incredibly beneficial to your spine’s health cookie clicker. Begin by walking in short bursts (5-10 minutes at first with a fast pace that causes you to swing your arms). The ultimate objective should be to walk for 10 minutes three times each day.
The article is very good!
this is awsome but can someone just jump onto these exercises after lumbar surgery?or there are other, introductory exercises? i need to get my core stronger desperately but i’m not sure i can do these immediately….please help! i’m one year post op.
Hey! An excellent set of exercises to strengthen the muscles of the body. I also recently recorded a video on my YouTube channel about training the muscles of the body. For my videos I use https://www.movavi.com/support/how-to/mac/how-to-convert-avi-to-mp4.html. Since it copes well with various formats and has a fairly affordable price compared to other converters. I wanted to share the link, because recently such a problem arose, my old converter started to fly out and ate the quality, turning the picture into some kind of soap box.
[…] second article by Dr. Aaron Horschig of Squat University is about strengthening the core muscles that surround our […]
[…] [10] The McGill Big 3 For Core Stability […]
[…] second article by Dr. Aaron Horschig of Squat University is about strengthening the core muscles that surround our […]
[…] McGill’s Curl Up – One of the renowned spine expert Stuart McGill’s Big 3 exercises for building a strong core, this will feel like you aren’t moving much at all if you are used to doing crunches. Lying on […]
There are a number of fun progressions you can do with this exercise. You can start by moving your hand placement from your opposite shoulder to the top of your hips or even move to a full side plank (bodyweight supported by your feet and elbow).
[…] https://squatuniversity.com/2018/06/21/the-mcgill-big-3-for-core-stability/ […]
[…] protéger ses arrières, Davidsdottir privilégie le « Les trois grands de McGill » : trois exercices de base conçus pour être effectués avant l’entraînement, en […]
[…] safeguard her back, Davidsdottir focuses on the “ McGill Big 3“: 3 core workouts created to be done prior to training, specifically for individuals that […]
[…] protect her back, Davidsdottir prioritizes the “McGill Big Three“: three core exercises designed to be performed before training, especially for people who […]
[…] protéger ses arrières, Davidsdottir privilégie le « Les trois grands de McGill » : trois exercices de base conçus pour être effectués avant l’entraînement, en […]
[…] protect her back, Davidsdottir prioritizes the “McGill Big Three“: three core exercises designed to be performed before training, especially for people who […]
[…] proteger su espalda, Davidsdottir prioriza el «Los tres grandes de McGill«: tres ejercicios básicos diseñados para ser realizados antes del entrenamiento, especialmente […]
[…] protect her back, Davidsdottir prioritizes the “McGill Big Three“: three core exercises designed to be performed before training, especially for people who […]
[…] protect her back, Davidsdottir prioritizes the “McGill Big Three“: three core exercises designed to be performed before training, especially for people who […]
[…] guard her again, Davidsdottir prioritizes the “McGill Big Three“: three core workout routines designed to be carried out earlier than coaching, particularly […]
[…] ihren Rücken zu schützen, priorisiert Davidsdottir die „McGill Big Three„: drei Kernübungen, die vor dem Training durchgeführt werden sollen, insbesondere für […]
[…] protect her back, Davidsdottir prioritizes the “McGill Big Three“: three core exercises designed to be performed before training, especially for people who […]
[…] proteger su espalda, Davidsdottir prioriza el «Los tres grandes de McGill«: tres ejercicios básicos diseñados para ser realizados antes del entrenamiento, especialmente […]
[…] protect her back, Davidsdottir prioritizes the “McGill Big Three“: three core exercises designed to be performed before training, especially for people who […]
[…] protéger ses arrières, Davidsdottir privilégie le “Les trois grands de McGill” : trois exercices de base conçus pour être effectués avant l’entraînement, en […]